How to Remove Background Noise from Audio Online: Practical Steps
Start with the original recording, reduce the background sound, then listen for what changed—not just what became quieter. This guide explains the Noise Remover workflow and lets you compare supplied fan and traffic examples before trying your own file.
The short version
- Keep an untouched copy and identify the part of the recording that needs help.
- Check your account’s available minutes and file limits in Studio.
- Upload the recording, choose a mode and process it.
- Compare the same passage in the original and processed versions.
- Download a suitable result; keep the original if cleanup damages the voice.
First, identify the noise
A steady fan or hiss, a passing vehicle and a door closing are different problems. Listen to a section with speech and a section without it. Is the sound present throughout, or does it briefly cover a word? Does the recording already sound distorted?
| What you hear | What to check |
|---|---|
| Continuous fan, hum or hiss | Compare the background during pauses and check that quiet words remain intact. See the fan-noise guide. |
| Traffic, typing or a door closing | Listen where the sound overlaps speech. A quiet pause alone does not demonstrate that an interrupted word was preserved. |
| Echo, overload or missing words | Do not assume noise reduction can fix the recording. A different take, closer microphone or manual edit may be needed. |
For a traditional noise-profile approach, Audacity’s documentation distinguishes steady noise from irregular interruptions and warns about voice damage when the noise overlaps the wanted sound. That is guidance for its own effect—not a benchmark or guarantee for Noise Remover. Read the Audacity Noise Reduction manual.
Listen to the supplied examples
Choose Fan noise or Traffic noise, then switch between Original and Processed at the same playback position. Listen to word endings, breaths and pauses. Decide whether the remaining noise and any change to the voice are acceptable for your recording.
Whole-clip level match selected; not a speech-only match.
Same playback position · Real-file waveform · One amplitude scale
Native players and original-file downloads
| File | Duration | Source properties | Whole-file loudness |
|---|---|---|---|
| Fan · original | 15.49 s | 44.1 kHz · stereo · MP3 | -24.29 LUFS |
| Fan · processed | 15.49 s | 48 kHz · mono · WAV | -20.98 LUFS |
| Traffic · original | 27.98 s | 44.1 kHz · stereo · MP3 | -20.84 LUFS |
| Traffic · processed | 27.98 s | 44.1 kHz · stereo · MP3 | -16.77 LUFS |
Use Noise Remover step by step
1. Keep the original and choose a useful test passage
Save the source file before editing. If the full recording is long, make a separate short copy containing both speech and the unwanted sound. A sample with only silence tells you little about whether cleanup will damage the voice. Processing another version may use additional account minutes.
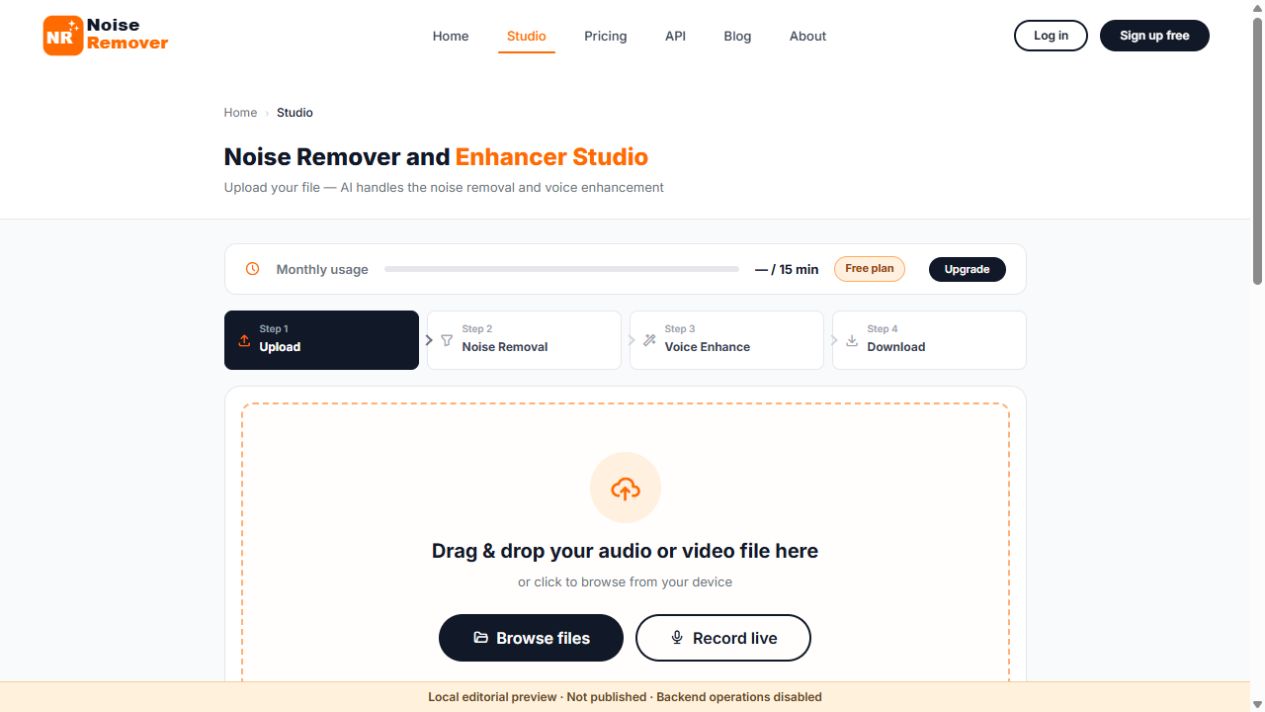
2. Open Studio and check your allowance
Open Studio and sign in if required. Check the monthly usage display and the limits for your account. Monthly minutes, maximum file size and maximum duration per file are different limits. A paid account does not mean every format, size or duration is unrestricted. Use the current pricing page and your account display rather than an old figure copied into a guide.
3. Choose the supported source file
Use the upload area to select the file from your device. Check the name and size before continuing. An extension such as MP3 or WAV is a starting point, not proof that the file is intact or contains a supported audio stream. Renaming an unsupported file does not convert it.
4. Select a mode and process
The current Studio interface offers Auto, Podcast, Video, Call, Voiceover and Music. Auto is a starting point if you are unsure. Choose a mode that suits the material, then listen to the result rather than treating a mode name as proof that it is stronger or better.
Wait for upload to finish and processing to complete. Upload time depends on the file and connection; processing time also varies. This guide does not promise a fixed completion time. Do not repeatedly submit the same file because the first request appears slow—check the displayed state or error first.
5. Compare the result before downloading
Use the original and enhanced playback options in the result screen. Replay a word under the noise, a quiet sentence ending and a pause. Watch for missing consonants, changed breaths, a hollow or watery voice, and audible fluctuations. A lower background level is not a useful trade if the words become less intelligible.
If the result is unsatisfactory, return to the original before trying a different available mode. Do not assume repeated cleanup passes will restore detail. You may prefer a little remaining noise to a voice that sounds heavily processed.
6. Choose an available output and save it
Select a format actually offered for your result and plan. Keep a lossless master when you intend to edit further, and use a suitable delivery format for the final destination. Converting a previously compressed recording to WAV does not restore discarded detail. The audio-format guide explains the distinction.
Play the downloaded file, not just the browser preview. Check the beginning and end and retain the original alongside it. For account/file-retention questions, read the current privacy policy; this guide does not promise immediate deletion or a particular download-link lifetime.
Make the comparison fairer
Use the same passage and a comfortable listening volume. The supplied processed fan clip measures 3.31 LU louder overall than its original; the traffic clip measures 4.07 LU louder. That can influence your judgement even before you consider the background sound.
The demonstration’s optional level-match control attenuates the processed file to the quieter original’s measured whole-file loudness. It does not boost the original or change either saved file. These are integrated measurements, including speech and background—not a separate measurement of speech or noise. On devices where matching is unavailable, the player explains that it is using the original file levels.
The waveform uses one fixed amplitude scale for both versions. It is not stretched separately to make either file look better, and it is not a visual score for intelligibility. For more on level decisions, see loudness after noise removal.
If upload or cleanup does not work
| Problem | Useful next check |
|---|---|
| Upload is stuck or rejected | Read the error; check connection, available minutes, account file limits and whether the source plays locally. Keep the file while asking support for help. |
| Background sound remains | Check speech-overlap sections, not only pauses. Try another available mode from the original if appropriate, or improve the next recording. |
| The voice sounds worse | Compare at a similar listening level. Keep the source; consider accepting more noise, editing a short interruption or recording again. |
| The download looks or sounds wrong | Confirm which format was offered and selected, then test the downloaded file in another suitable player. Share a non-sensitive error with support, not passwords or verification codes. |
Frequently asked questions
Can I remove background noise from audio for free?
You can use the free account’s available allowance. Check the current minutes and export options before submitting a file. Free access does not mean unlimited processing or guaranteed recovery.
Does the process remove every unwanted sound?
No. Noise that masks speech, distortion, echo and other voices can limit the result. Listen to the processed file and keep the source.
Is a quieter waveform proof of better audio?
No. A waveform shows amplitude over time, not whether a word survived or a voice sounds natural. Use it to locate a passage, then listen.
Can I use a video instead?
The website has a video workflow. See the video noise-removal page for the service and the video tutorial for instructions. Check the output options offered for your job rather than assuming every result is an audio-only file.
Sources and demonstration notes
- Audacity: Noise Reduction—technical reference for the limitations of its noise-profile effect; not a Noise Remover performance test.
- FFmpeg: loudnorm documentation—the local measurement tool used for the supplied clips’ integrated loudness and true-peak readings.
Sample properties checked on 9 October 2026. WAV and MP3 originals are preserved. Fan output is mono while its source is stereo, so channel differences may also affect the comparison. This guide describes our own service; it is not an independent ranking of noise-removal products.
Try it on your own recording
Keep the original, check your allowance and judge the result by listening.